 The bulb catalogs start coming by the beginning of summer and there is a good reason why. Spring blooming bulbs should be planted in the fall and you need time to plan, order, prepare the soil, and then plant the bulbs so they will have time to produce a good root system before the cold weather sets in. Mail order places will ship your bulbs at “the right time to plant in your area”. If you decide to pick up some bulbs at a local store they will probably be available in early September. When you see them, buy them, and plan on storing them until the conditions are right for planting.
Here are seven steps for planting spring blooming bulbs.
1. Storage. Keep the bulbs cool and dry in a basement or garage wrapped in a paper bag. This will keep them dry but help prevent drying out. Never put them in plastic bags as moisture from the bulbs will collect and lead to rot. If you have the space, keep them in a refrigerator at a temperature between 38-40 away from fruits such as apples that give off ethylene and can damage the bulbs.
2. Time of Planting. Bulbs need to feel that winter is approaching or their life cycle will be thrown off. Wait until the soil has cooled to 55 F to put them in a wintery mode. This usually occurs after the first killing frost. Gardeners living in very cold northern areas of the country can plant their bulbs, except tulips, any time in the fall but they too have to wait until the soil cools to plant them. In USDA zones 8-10 bulbs should be chilled at 35-48 F for 10-12 weeks prior to planting.
3. Schedule of Planting. Some bulbs do better in storage than others so start planting the ones that are most likely to dry out first. Small bulbs dry out faster than larger ones, and bulbs without papery coats (like guinea hen flowers) dry out faster than bulbs with papery coat (liked crocuses and snowdrops). Tulips and daffodils are big bulbs with papery coats and so they can be planted after the others. Look your bulbs over and classify by size; for each size class plant the ones without a papery covering before those with a peppery covering.
4. Choosing the Site: Plant most bulbs where the soil is well drained. A few bulbs like wet soil but most will rot in it. Most bulbs like a lot of sun while growing so look for a place in full sun or where the trees will leaf out as late as possible.
5. Soil Preparation: Dig a two inch covering of organic matter into the soil to improve fertility as well as water holding capacity. Bulbs like 6-7 pH, have a soil test and add what is necessary.
6. Planting. There are two major methods of planting. The first is the most familiar, digging individual holes for each bulb, the second involves excavating a large area to the depth needed. If you only have a few bulbs the individual hole methods if adequate but if you have numerous bulbs the excavation method is quicker and easier in the long run.

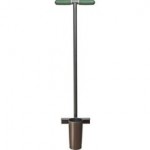
 Individual hole: You can use a trowel or a specialized tool that that has a bar on it near the ground that you can step on (see picture), or an electric drill. In general, make the hole so that the top of the bulb is twice the height of the bulb from the top of the hole. Small bulbs are generally planted in 5” deep holes, and large bulbs are planted in 8” deep holes but check the instructions that come with your bulbs for details. You might want to plant a couple of inches deeper in sandy soil, and a couple of inches closer to the surface in clay soils. Space the holes 3-6” apart for large bulbs, 1-2” apart for small bulbs. Loosen up the soil in the bottom of the hole and place bulb in the hole being careful to make sure that the bulb makes good contact with the soil, and that the bottom of the bulb (has a flattened area often with tiny roots) is pointing downward. Water thoroughly.
 Excavation: Dig out the bed to a depth of 5” for small bulbs, 8” for large ones. Arrange the bulbs in the area spacing large bulbs about 3-6” apart and small bulbs 1-2” apart, making sure the bottom of the bulb (has a flattened area often with tiny roots) is pointing downward. Replace half the soil, water thoroughly, and add the rest of the soil, watering again upon completion.
7. Fertilizing: There are many opinions on this but most authorities agree NO BONEMEAL! It is traditional but not effective (it’s been processed differently than the old fashioned kind) and attracts unwanted animals including skunks. As you plant, incorporate one rounded tablespoon of 10-10-10 or 8-8-8 into the soil in the hole or bed. Apply another application around the emerging leaves in spring.
If you want to get fancy with the planting you can actually layer the bulbs by size. For example, if you want to have crocuses followed by tulips, put he large tulips at the bottom of an 8” hole, full the hole within 5” of the top, add a crocus bulb, and then fill in the hole. Try to organize the bulb display so that you have one large and one small bulb in a single hole, and the bulbs flower at different times. That way you will have a more continuous bulb display in the spring.