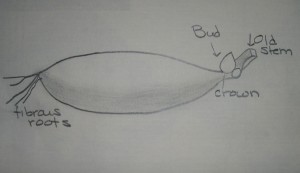
 If you love growing dahlias and live in zone 8 or colder you may want to consider saving them from year to year. The process is not difficult and by doing so you can have your favorites back in your garden year after year. In addition you will increase your supply, have some to trade, and will save money. Certainly a win-win situation and you have little to lose but a bit of time
1. After the first frost kills the foliage and the foliage becomes black, cut the main stem through a solid leaf node, down to with in 6 inches of the soil.
2. Wait a week so that the tuber can produce more eyes. (If a hard frost threatens skip this wait and go on to the next step.)
3. Dig up the tubers by digging about 12″ from the stem because the clumps of tubers will be much larger than when you planted them. Leaving the stem intact, wash off the soil being careful not to damage the tuber skins, and allow them to dry upside down in a frost-free airy place for about a week. Don’t let them become hard.
4. Divide large clumps by slicing through the main stalk stump with a sharp knife so that each division has at east one eye. Throw away dried, shriveled, or decayed tubers and ones with no eye.

5. Label the tubers with a laundry pen or other permanent marker so that you know their color, height or cultivar name. Alternatively, sort the tubers into groups by type, keep each group separate and label the group as a whole with tie on tags.
6. Dust each division with powdered sulfur or 1:1 mix of powdered sulfur and lime.
7. Store the divisions in coarse vermiculite, milled sphagnum peat moss, dry shavings, coarse sand, or newspaper placed in plastic bags with punched holes or in heavy cardboard boxes. Make sure that the divisions do not touch each other.
8. Store in a cool (35-50 F) garage or basement. The consistency of the temperature is important. You don’t want the divisions exposed to freezing temperatures but you don’t want them to be warmer than 50 degrees either. The area must be dark.
9. Check the tubers monthly for decay and remove any discolored areas. At the same time mist the tubers if they seem to be shriveling. Don’t expect all your divisions to survive; they probably won’t due to rot or temperature fluctuations beyond your control. But you will still have an increase in the number of dahlias at a fraction of the cost of buying new ones.
10. About 2 weeks before the last frost when the soil has warmed to about 60 F, remove the tubers from storage and plant. For an early start, plant tubers in pots 6 weeks before the last frost.
Saving dahlias from year to year brings a lot of satisfaction as well as more dahlias so give it try at least once.

[…] These guidelines are for short term storage, not over a long period when drying out becomes more of a threat. Tender bulbs and bulb-like structures may be lifted and stored for winter but different methods are used to ensure that the bulbs do not dry out. See also my post on how to lift and store caladiums, and my post on overwintering dahlias. […]