 We have been growing tomatoes for many years and have tried just about every technique to keep them off the ground and supported. For a long time we used 6′ lengths of used 3/4″ iron pipe and although this method worked pretty well it required tying the plants to the post at least once a week. We finally decidedly to really do it right and build heavy wire cages for the tomatoes, and it was not just successful, it was a whole different experience growing tomatoes.
There are probably a hundred ways of making tomato cages; but here is one method that resulted in minimal construction time and effort, and very sturdy cages that should do the job for many years to come. Follow these steps and you will maximize your garden space and be amazed how successful it is to grow caged tomatoes.
1. Purchase a roll of concrete reenforcing wire mesh. This is “industrial strength” wire mesh that comes in 50′ and 150′ rolls that are 5′ wide and have 6″ holes between the welded wire. We found a cage made of a 5′ length of this material gives the best results. This encircles an 18″ diameter area that is large enough for the tomato plants to grow and spread, yet small enough that they are supported as they grow without needing to tie them. A short side note, because we needed more than one 50′ roll we purchased a 150′ roll, made 15 cages (using 75′) and then sold the remaining half roll very easily on Craigs List.
2. Cut the wire into 5′ lengths. Since the wire is 1/8″ in diameter the cutting requires a large pair of wire cutters or small bolt cutter. I actually used a pair of swedish cutters designed to cut wire rope up to 3/8″ in diameter. It was overkill but really made the cutting job easy. When making the cuts leave one side flush with the perpendicular wire and the other so it has almost a full 6″ end.
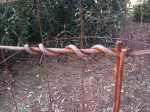
 3. Bend the length of wire into a cylinder shape and use the 6″ ends to tie it together. I found hooking the middle wire first worked best so the cylinder was held in shape as the other wires were wrapped around the opposite side. Using a Vice Grip (or pliers) to hold the wire being bent around the flush side of the cut worked well and resulted in a clean wrap that didn’t have any wire ends poking out that could catch clothing (or skin) when harvesting tomatoes (see photo). After all the ends are wrapped a small push here and there will result in nice round 5′ tall cages. Note, many people cut the bottom row of wire to leave a row of 6″ spikes to push into the ground for support. I found cages with these fingers were prone to winter storage problems and the spikes were not adequate for support without staking.
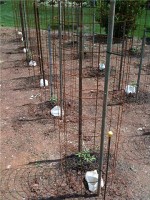
 4. Place the cage around young tomatoes and stake for support. Level the soil around the newly planted tomatoes so the cage is vertical and solid on the ground, then drive a 4′ or 5′ length of 3/4″ iron pipe at least 12″ into the ground on both sides of the cage. Keep the stakes as close to the cage as possible. Using electrical tie-wraps, attach the cage to the pipe at top and middle of the pipe to ensure the cages will remain solid as the plants grow to the top. These stakes may sound like over-kill; but when the plants get 5′ tall and you have a strong wind the cages/plants will not lean or fall over.
5. As the plants grow weave the branches that come through the cage back towards the inside. Then sit back and watch your tomato plants grow and prosper in the cages.
We grow the caged tomatoes in rows 5′ apart with a 5′ spacing in the rows. Although this may seem like a large amount of space for tomato plants it allows adequate sunlight to reach the plants and plenty of room to walk between the caged plants.
Although growing tomatoes in cages may initially cost more than traditional methods of staking them, these sturdy cages should last a long time and do provide excellent support with very little work once the cages are in place. Winter storage could be a problem if you want them out-of-sight. Because they are cylinder-shaped they don’t nest and take up a large amount of space to store.
